Wednesday, May 24, 2017

WOYWW Happy 8th Anniversary Everybody!

I'm sorry to have so very little to show for this past week's projects (projects? - try process) 

Before I go any further, I want to express my sympathy for our UK members whose lives have been disrupted recently by the bombing in Manchester, England. Our thoughts and prayers are with our UK friends during this time of disturbance, sorrow and change.

The desk is still in transitional stage. Everything is in an uproar. I've changed some of the layout of what I call my creative corner, but it is an unsightly mess and not worth viewing at all. Boxes, boxes everywhere. Drawers still yet to be reordered into workable terms. In short, sheer CHAOS. Mind the piles and stacks and do watch where you are about to walk!

To join in this week's special 8th Anniversary WOYWW, you can hop on over to Julia Dunnit's Stamping Ground where there is a Linky tool that allows her guests to join her weekly workdesk events. Thanks go to Julia for making WOYWW the best hop around and one of the longest lived!

One touch of weirdness I chose to add following last week's "glue bottle hat" adventure is this:


I guess we never really know what we will find during spring cleaning/reorganization times, do we? Last week, it was my "glue hat," while this week it's a wee tiny little "bucket" made of dried and swirly reddish orange + yellow acrylic paint from one of my set of small plastic containers. I generally work with small batches of color anyhow, preferring to keep my main colors in their tubes and jars within sealed zipper bags for freshness. That is why this little "bucket' was able to dry out in such a funny way.

I am thinking of making a Joseph Cornell style "shadow box" of some sort using this tiny "bucket." Either that, or I might cut it apart and fuse parts of it to a page or a painting. I am open to suggestions.

What do you think? Please leave me a comment with any ideas. Despite all losses and every upset for our gallant UK deskers and their friends and families,
Happy WOYWW 8th Anniversary!


Wednesday, May 17, 2017

WOYWW #415 Cleaning + Altered Book Breaktimes

This book that I've slowly (10 years now!) been altering needs some love.

To join in this week's WOYWW, you can hop on over to Julia Dunnit's Stamping Ground where there is a Linky tool that allows her guests to join her weekly workdesk events. 

I really like this book for altering. It's fairly good sized, has a sewn binding and sturdy plain black covers, front and back. The spine seems a bit weak, but that can always be remedied, of course.  
:)

Here's a sneak peek at a few of the details. I've only recently added some gesso to one page, overtop of which went soft lavendar with mooshed in streaks of gold Perfect Pearl Powder. The splatters are of Mod Podge original formula with some copper Perfect Pearl blended in. More on that later.


Some of you know that I've really got too small a creative space nowadays for much storage. This means keeping things as simple as I can. I live life on a budget too, so anything that I might choose to buy I'd need to think about first like this: 1) Where do I put the thing? And 2) Would it be useful in enough ways to make storing it the thing to do?

The next photo shows some of what I've been working on this past week. The clutter is all about tidying up following clearing my Mini Mister set of that messy residual pigment. The zipper bags are waiting for their new home. 

Mini mister cleaning is...well...fairly messy! That turned out to be a bit of a tough and long project in and of itself. You see, using anything gooey such as thinned paint or (as I did) acrylic ink, with a Mini Mister is bound to clog and/or collect inside of the tiny parts that you can see but that nobody could reach without breaking into them. This led me to experimenting using the leftover liquid from a canister of Clorox Wipes for soaking. (No bleach in that formula, so please don't worry)


The first step, of course, was to break everything down into the separate parts. I even removed the little interior ring from inside the mouth of each container. Everything then got a nice, leisurely soak in the leftover Clorox wipe cleaning solution. I actually forgot that I'd left things that way for a few months, I've been so busy with other things.

I followed that step by rinsing everything well, wiping out residue using a corkscrew of paper toweling (that softer kind called Viva) I next filled each one with enough water to use for a spritzing final rinse. This worked! One benefit was a soft pink sprayed blur on some scrap paper that I may use someday. They may not look brand new, but they do look a lot cleaner. It's a cleaning tip...sort of. Lolz
:)

Now back to that book altering project! The 2 pager being added to on its left hand page.


And now for something else to do with my cleaning and reorganizing project. I like good quality PVA whenever I bind books that require some gluing, don't you? This bottle I've managed to keep now for years. And years. Long time. You see, I generally use stitching and folding techniques most of the time for the making of books nowadays. I sometimes need to rest my hands, and gluing in bookbinding can be very unforgiving if one cannot remain busy for long enough to make sure that everything comes out smoothly. That's how come there's still so much of it that remains still inside this bottle!

Hahaha!! It had a "hat" on when I removed the cap! Apparently, some of it had splashed to the top of the inside of the applicator tip when I was moving to where I now reside, where it dried, forming that funny looking "hat." I simply had to take a picture of it before removing that hat. I hope you can appreciate my strange sense of humor!
:)

The part which I think really has kept that old bottle so fresh was how I made certain to keep its tiny red cap snapped into place on the applicator tip along with placing the whole kit and kaboodle inside of a zipper bag. This last I always "burped" any excess air from just prior to closing. The final step was to wind a slender rubber band very tightly around the tip, bundling the plastic of the bag in place at the same time. For ten whole years, this has worked!

But then, perhaps that accidental and funny looking little "hat" has helped a bit too. Who knew that glue could help me out in such a funny way?
:)

See you all later today and Happy WOYWW!
Rose

Wednesday, May 10, 2017

WOYWW #414 Rough Cut Journal Goes Messy!

(Oh my goodness! Am I too late?) I love my Rough Cut and Wrinkled cereal box + duct tape journal so much that I call it my Playtime Journal.

It's a good one to use when I really want to relax, make messes, and silence the inner critic. Silencing that inner critic can really be a challenge at times, can't it? This journal seems to help with that a bit.

Here's that project. I'll explain further below, for those who have enough time for my messy musings.


For more WOYWW fun, visitors can head for Julia Dunnit's Stamping Ground where there is a Linky tool that allows her guests to join her weekly workdesk events. 

I'm back after a year long hiatus with WOYWW, but before I took that long break I posted about the making of my Rough Cut and Wrinkled journal. If you'd care to see more about its construction and innards, you may visit that post HERE.

The Mission Inspiration prompts I chose to follow this time I first heard about from one of my favorite vloggers, Shel C of Ocotillo Studio. They may be found at her recent nautical-themed video HERE. She got them from Mike Deakin, who also has a fun channel on YouTube.

I don't know whether you can see it, but there really is a torn section of some stamped deli paper I made for a previous post at this blog ( Visit my "No Gelli Deli" HERE) in the bridge between pages. While some of it smeared owing to a pigment issue, I still enjoyed the final outcome and so have chosen to leave it as is. Besides, I figured it would add some durability to this overworked pair of brown paper pages.

The project had already been underway since last year, so I had to alter it before it would fit the prompts list. Prompt colors this time include Teal, Lavendar and/or Grey. I made my own batch of Teal to use in this case. I tend to enjoy mixing my own colors in small batches and keeping them in tightly lidded small containers as I have less space than I used to have for my creative side.

The pages were already coated with some of my experimental homemade faux "gesso" along with some blended streaks of blues and greens. The paper underneath is from a used paper bag or else from brown packing paper.  That was last year's part. 


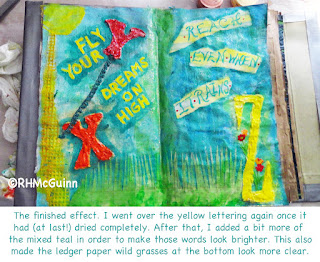
More recent additions were reconstituted (almost ruined out of neglect on my part!) modeling paste alphabet letters. The idea at the start was to have the letters, X, Y and Z be friends playing hooky outdoors and getting caught by a sudden spring shower. I later finger painted them in orange, red and yellow, respectively. 

The "household item" I used to make a mark may be seen in the photo at the top of this post. It's an upcycled little plastic cup from a sandwich place that delivers me yummy fresh salads now and again. It used to contain a serving of parmesan cheese. It was used to make the playful and childlike sun, upper left.

Another prompt is to use graph paper or composition paper collaged into the design. I couldn't figure out what had happened to my nice green graph paper, and so fudged this bit just a smidgeon by using a greenish ledger paper sheet instead for the grass at the foot of the page. I overlaid this with a thin glaze of Mod Podge + acrylic paint. 

I like sparkle when I am being playfully creative, so naturally there has to be glitter. I mean - c'mon! Ya gotta have glitter, right?  :) 
I've used 2 types of glitter here, one in a thinned Mod Podge runny formula into which I've added superfine iridescent clear glitter. The other one is applied glitter at the end, while things were still really sticky. The tiny shaker for it may be seen in my photo, too.

For the ribbon, yarn or string part, I chose to go with a remnant of textured yarn to use as a kite string. I painted over it using my teal, but it does not show up very well in the photo, unfortunately. The kite idea allows me to fit my XYZ picture into the Prompt theme ideas, which included the idea that we are to "Reach" and to achieve.

I opted to use torn strips of scrapbooking paper to one page to use under some words done using that Teal paint that I'd mixed. I had to use a fine tipped detail brush for those letters since my fine tipped squeeze bottles appear to have gone missing. That worked out OK for me, which was a surprise since I really am not very good at hand lettering. The other letters on the facing page I made using that same brush, but in vivid yellow this time in order to create balance for my Z.

The 3 focal points are, of course, the Modeling Paste alphabet letters that are "playing hooky" from school in a sudden rain shower. The best part of it is that we were enjoying a nice thunderstorm at the time! I love a good thunderstorm, despite any possible lightning, don't you? Everything smells and sounds delightful. I'll sometimes leave my windows wide open for a storm like that as long as the rain's not windblown in the wrong direction. 

I guess that's everything on the list now. Thanks for popping over despite my being tardy. Hope everyone's having a splendid Wednesday! See you all very soon!

~Rose

P.S. Here's the Final Reveal. Definitely wrinkly and messy fun for me!
:)


Wednesday, May 3, 2017

WOYWW #413 (with a long hiatus)

Making time for some WOYWW fun today, even though there isn't much for you to see.

If you want to see what everybody else is doing, just follow this link HERE to Julia's Stamping Ground blog. I can hardly wait to see what everyone else is up to today!

I'm tempted to title this post "A Blob and Some Bits" lolz. The blob is a mysterious chunk of gunk which I recently dislodged from the bottom of the jar it was inhabiting. I had to soak it in water for days in order for it to soften enough. The weird thing is that I still have no idea as to exactly what form of substance it was! The good news is that I now have a cleaned out art jar to fill with some other substance - this time with a waxed paper shield between the lid and the jar! It took forever to remove that stuck-on lid.

The hunk of mystery gunk or blob I posed at my cutting and punching station so you could see what it looks like:


Far from fascinating for the viewer, but it is what's on my work desk today. I guess I'll never figure out what that was. Heaven only knows!

The "Bits" are a few of the paper tiles that I made last month and that are shown in my most recent blog post here. I've replaced my Scrabble letters in order to add some more color and pizzazz to one part of my storage + display area. The rail is resting atop a tiny doll sized chest of drawers in which are kept small items used for collage.


Now to finally get to see what all of you have been up to!
:)